New Youtube Channel

Now that my home's internet speed is upgraded, I can make more videos!
This is my new channel https://www.youtube.com/channel/UCgW4rIH3Gg6Lc8v4G0QlqgA
Please subscribe!

Friday, July 9, 2010

Stone Fruit Tea Cake again.. with Vanilla


I made this again, Yes I did!!!

I said I will try this again with the original crust recipe and yes I did.

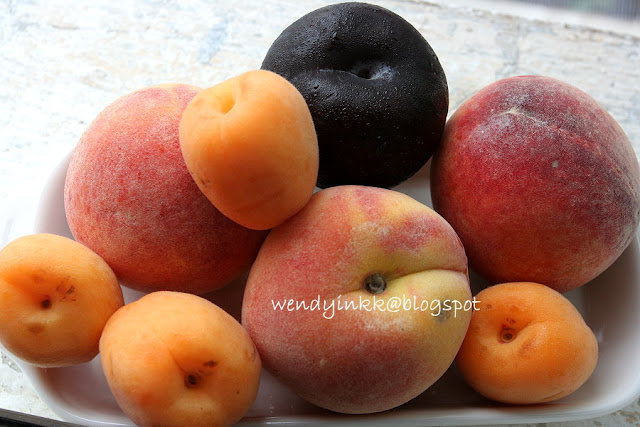
I said I'll use fresh apricots and peaches if I see them, and yes I did

Did I prefer this over the orange crust? Oh yes I did, and I still do.


The first cake never lasted more than 1 day, all clean up. But then, for this, I made this slightly bigger and it took me and my mom and some others 2 days to finish it. It was better the next day, cos the moisture from the fruits penetrated the cake and it was so lovely.

Oh by the way, my peaches are darn sour too, besides my super sour apricots.... so instead of sprinkling the sugar on the crust, I sprinkled a generous amount of sugar on the fruits, before I toppped with the dollops of batter, and skipped the sugar for the crust. It was still slightly sourish after it came out from the oven. And weirdly, the sourness were greatly reduced the next day. The cake was sweet and flavourful. Hahaha!!! I don't know why!

1 Tbsp butter (for greasing pan), or just like the pan with paper and skip the butter
200gm all purpose flour
2/3 tsp baking powder
2/3 tsp salt
130gm sugar (pulverized with seeds from 1 vanilla bean)
115gm butter
2 eggs
Extra sugar for sprinkling.
3 peaches, 4 apricots and 1 black plum, or any other stone fruit that you like, cherries, nectarines or fresh prunes

1. Preheat the oven to 160/180C. Prepare a 7X12 baking tray, buttered or lined with paper, or just use a 9 inch round or square pan.
2. Whisk the flour, baking powder, and salt together in a bowl. With a mixer, cream the sugar and butter together on medium-high speed for 3 to 5 minutes, until light and fluffy. Add the eggs one at a time, scraping down the sides of the bowl after each addition.
3.. Add the flour in 2 or three shifts, mixing just until a smooth dough forms. It will be pretty soft still.
Divide dough into 2 portions, one slightly larger than the other. Dollop the larger portion of batter onto prepared pan. Use a spoon to press down the dollops and spread it around.
4. Cut fruits into small pieces. Scatter the fruit over the dough. Generously sprinkle with sugar if they are sour. Dollop small balls of dough over the fruit. It will look charming no matter how even the blobs are, so don't worry too much about getting them perfect.
5. Bake for 30 to 40 minutes (I baked for 35), or until lightly golden and firm. Cool for 30 minutes before serving.

By the way if you want to know how much this cake cost me, almost RM30 and it's a week's lunch.


I'll be watching out for late season stone fruits as these early season ones are just so sour. My 2nd elder brother once worked for a summer(for fun) in a fruit orchard in New Zealand, and he told me about late season fruits, and all the best ones were not sold, but they all went into the tummies of all the fruit pickers. He was a proud "I'm a cherry picker" fella, with t shirts as his proof.

This time, it definately had a more rustic look... Simply looked homemade :)
Made and photographed in Kampar

Thursday, July 8, 2010

Iced Calamansi Tea


This is the de facto favourite iced drink of Malaysians, Teh-O-Ais Limau.

It is actually a local version of Iced Lemon Tea. Lemons don't grow here, but calamansis thrive here. So, we use calamansi to go with iced tea and it taste absolutely lovely.

Actually I don't really like the Mamak's version (local Indian muslim eateries). I prefer my mom's. Mamaks only use 1 calamansi. My mom uses minimum 2. They use cheapo brand tea dust, my mom uses Boh. So, after drinking the version made with quality tea dust and more calamansi, those out there seems.... diluted.

If you ask me, Boh or Lipton. I will at anytime say Boh. I never like Lipton, it's got a tanninny taste whereas Boh is fragrant and smoooth.
And if you want to know whether there is colouring added to your tea dust, there is one simple experiment.
Just put your tea bag or tea dust into a cup of cold water (tap water will do) and if the water is coloured, then there is colouring. Because real tea is supposed to release its colour only with very hot water.

And if you are used to the orangy coloured milk tea or dark amber plain tea (like mamak teas), I'm so sorry that if you do this with Boh tea, it's gonna make you dizzy. Some people cannot consume too concentrated tea, it makes them dizzy. My mom does. And with Boh, the colour should be much lighter than when you use other teas, but believe me, the flavour is just as strong, and even better.

Iced Calamansi tea for 2 glasses about 350ml
1 Boh tea bag (yes one will do)
350ml boiling water
Sugar to taste
4 calamansi limes

1. Place tea bag into a heatproof jug/teapot., or a large glass/mug
2. Pour boiling water onto tea bag and let it steep for 5-10 minutes. The longer the darker.
3. Sweeten with sugar (must be slightly oversweetened).
4. Pour into 2 glasses, squeeze juice from 2 limes into each glass and top with lots of ice.

Perfect for a hot day :)


Actually if you ask me, I prefer the red one than the gold blend.
Hahaha!!

Tuesday, July 6, 2010

Chocolate Streusel Coffee Cake


** Cheeky grin**

Why such a title?
This is a cake…
No....
this is a bread….
No…
This is a cake….
No….
I don’t know!!!!!

** Serious look**


Okok. Seriously I am confused too. The actual name of this is Danish Chocolate Streusel Coffee Cake.
I am very confused, there’s no Danish pastry in there, doesn’t look like a cake at all here, not a bit. So let’s take it as a bread. Or is there anyone that can answer me why is this thing called a cake. I think same goes for all the questions regarding why is banana cake usually called banana bread. Oh, this one I can answer, cos banana cake is considered a quick bread, leavened by baking powders/sodas instead of yeast. But why is this Chocolate Streusel Coffee Cake called a cake and not a bread???? Anyone out there???

But who cares what the name is… important is it’s YUMMY!!!!
The texture is so soft, the choc streusel’s heavenly. And the best is I only knead it by hand for 10 minutes!!!! The last time I baked bread was more than a year ago, in my collection of Sweet Buns. I was so into the sweet bun thingy, that I wanted to really learn how to make soft sweet buns, and I made it every few days until I really got the hang of the kneading process. 30 minutes by hand, my friends.. 30 minutes. When I finally got it, I said, no more sweet buns… for an indefinite period of time. My arms were very tired.

And now, my bread kneading has come out of it’s hibernation because of this site and was taken to the original recipe. I changed the recipe a bit, both ingredients and method (slightly only). My husband is no fan of cinnamon, so I used vanilla in both the cake?? and streusel.


Cake dough … not bread dough …LOL 
125ml milk
1 empty vanilla pod (seeds scraped for streusel filling)
1 and ½ tsp dry yeast
30ml water
Pinch of sugar
80gm butter (salted), slightly softened
40gm sugar
1 egg + 1 egg yolk
Small pinch of salt
350gm all purpose flour


1. Bring milk and vanilla pod to a boil. Leave to cool down to warm.
2. While milk is cooling down, proof yeast with water and pinch of sugar until very frothy.
3. Beat butter and sugar until pale and light.
4. Beat in egg yolk, then the whole egg until well incorporated.
5. Beat in ¼ of the flour. Then 1/3 of the milk. Beat until smooth
6. Repeat step 5 twice. Give it a good beating for 2 minutes.
7. Beat in the yeast mixture and the final ¼ of flour.
8. Transfer to your kneading table or basin and give it a good knead for 10 minutes by hand until smooth and elastic. (you can use your machine, of course, but it won’t 10 minutes, 5 or 6 will do)
9. Place in a buttered bowl, turn to coat, and cover with plastic wrap or a damp tea towel, leave to proof until double in size for about 1 hour (I just dumped the whole basin into my cool oven to proof)
10. Meanwhile do the streusel.

Streusel Filling
70gm sugar
Vanilla seeds from 1 vanilla pod
2 Tbsp all purpose flour
1 Tbsp cocoa powder
25gm melted butter

Pulse everything in a food processor except butter. (Or if you don’t have a food processor but only a blender like me, mix cocoa powder and flour together with a spoon until well combined. Pulse sugar and vanilla seeds in the mill for a few seconds. Combine sugar and flour mixture.) Drizzle melted butter over prepared dry ingredients and mix until well combined like fine chocolate crumbs. Leave aside until use.

Assembly:
1 egg white beaten until frothy
Almond slices

1. When dough, has risen to double in size, punch down and give it a good knead for 1-2 minutes. Leave it to sit for 5 minutes.
2. Roll out dough into a rectangle about 10X14 inch. Spread streusel mixture on top evenly,. Roll up dough and put dough seam side down on your lined baking tray.
3. With clean sharp scissors, snip ¾ inch intervals along the roll, cutting through ¾ of the dough only.
4. Start with one end, pull one piece of cut slice and twist it to the right. Take another cut slice and twist it to the left of the roll. Cut surfaces facing up. Repeat with all the the cut slices.
5. Leave to proof in a warm place for another 45 minutes or until doubled up again.
6. Preheat oven at 180C
7. Brush the loaves with the beaten egg white and sprinkle with almond flakes.
8. Put in preheated oven , close the door and immediately turn down the temperature to 160C. Bake for 30-35 minutes until golden brown.


After reading through, do you have the answer why this is called a cake?
I guess it’s due to the creaming method used in the earlier part of the recipe. Still… it’s very much a bread in my eyes. So, it'll be categorised at bread in my blog.

If you do not have access to vanilla beans, you can either follow the original recipe that uses cinnamon or just substitute with some vanilla extract. Please note that the cake/bread dough is soft and tacky, but not very sticky.


Sunday, July 4, 2010

Fresh Apricot Almond Tarts


Remember I said I saw some more apricots going alot cheaper, at RM8.90 for 8 pcs. Did I buy them??? Of course I did.

This time, they are a bit sweet and very slightly tart only. Hahaha....

I saw this recipe on Tartelette and I’ve got tart cases in the freezer, yeah from the galette and some extra from egg tarts. So I halved the recipe and made this. And loved the fact that she used honey here and most recipes I’ve seen before uses sugar.

BTW, do you know that sugar is hard to come by now??? Read here.  Many grocery stores are no longer selling them, due to government restrictions. But I can still get honey everywhere..

The original recipe called for cream, but to open up a carton for 2 Tbsp???? Nah, a bit wasteful right? Unless I'm doing other stuff, but nope, not that that time. So, I replaced it with milk
Anyway, with honey (and not sugar) in the filling mixture, it's runny enough and the filling almost couldn't hold my apricot slices up.


Fresh Apricot Almond Tart
Makes 8 tart

8 small cold tart cases (any recipe you like)
55gm softened butter
55gm honey
1 egg
2 Tbsp milk or cream (I'll omit this next time)
50gm ground almond

4 ripe rosy apricots, sliced

1. Preheat oven at 170/180C
2. Combine softened butter, honey, milk, egg and ground almond together until combined. Do not whisk too much.
3. Pour into prepared cold tart cases and top with sliced apricots.
4. Bake for 30 minutes (I baked for 23mins)
5. Sift icing sugar over baked tarts and serve warm.... yummy.


Oh.. the smell of the tart baking in the oven is just heavenly. If only I could fleet and float, I will fleet, float and fly to sky

The taste, yeah.. what do you think? Butter, honey and apricots..... simply marvellous. My kids shared and ate 4 tarts that evening, 2 at 6pm, another 2 at 9pm. They wanted more, but I had to stop them.
The tartness of the apricot seemed to have intensified after baking, but it was still much better than the galette. My kids didn't bother about the tartness of the apricots cos they are lemon suckers. Apricots are nothing compared to lemons :)


Friday, July 2, 2010

Tofu with Angled Loofah


The final of the black soy bean trilogy, all posted in 3 days. First I made the soy milk, then I made the tofu, and this time I cooked the tofu ;)

Or maybe I'm a cheater for splitting this post that supposedly can be done in one. Well, they are actually 3 different recipes and when I post them separately you don't lose sight of any of them :) So, no excuses of not seeing either one.

This is a common recipe, and Swee San beat me at posting this, although I made this way earlier than the time she posted (yaya, I did this months ago :p). But there's no competition in the blogging world. Everybody makes their own stuff and blogs at their own speed. I'm definately a loser when it comes to speed. What I made today (yes today) will be seen here end of Nov... I do hope that the period of moving house will temporarily stop me from making any new stuffs, but the blog will go on, cos the drafts are already done, just waiting for the day to see light. By then I can blog quickly after I've made my stuff, so that you won't get any stale bakes and dishes.. BTW, smell anything weird???

Tofu with Angled Loofah
500gm tofu (those that I made earlier, or you can use Japanese tofu), cut into 1inch thick long strips
270gm angled loofah/ridged gourd (Before skinning is 450gm), cut into equal size with tofu
2 Tbsp oil
1 clove garlic, finely chopped
½ egg, beaten
1 cup water

Gravy (all mix together)
Few drops sesame oil
2 tsp cornstarch
2/3 tsp salt (or u can use chicken stock powder, but I do not find this necessary as angled loofah is very flavourful and sweet, salt will do)
1/4 cup water

1. Fry tofu strips until golden. Dish up and drain the oil.
2. Heat a wok on medium heat and put in 2 Tbsp oil.
3. Put in garlic and sauté until fragrant.
4. Put in angled loofah and fry until it is slightly softened, it will give out some moisture. Put in 1 cup water and let it simmer until loofah turns soft.
5. Put in gravy and cook until it thickens.
6. Return fried tofu into wok and gently toss, let the gravy coat the tofu and cook for a while.
7. Drizzle in beaten egg and toss gently.
8. Dish up


By the way,
Do you find my blog being different now?
My posts are no longer in the middle.

Which do you prefer,
 the middle or the left?

Do tell me, please.......

Printfriendly

Related Posts Plugin for WordPress, Blogger...