New Youtube Channel

Now that my home's internet speed is upgraded, I can make more videos!
This is my new channel https://www.youtube.com/channel/UCgW4rIH3Gg6Lc8v4G0QlqgA
Please subscribe!

Showing posts with label Fruits-Apple Pear. Show all posts

Wednesday, April 22, 2020

French Apple Cake


Cake is fresh and warm as I’m writing this, again with the phone.
I’m excited to share this recipe with you all.

During MCO, I prepare tea time daily, because we have early lunch. And whatever that’s left from tea, the kids will eat as supper. They are growing up now and they eat a lot :-)
My kids don’t eat the same cakes. And this cake pleases my eldest, but my Second kid won’t touch it.
So, I will bake things they like on rotation. Very few of my bakes pleases every kid in the house. They just don’t have the same taste buds.


Thursday, November 27, 2014

Potato Salad with Apple


It's a salad? Looks like mash... yeah... either way.
But it's not dressed with butter but mayonnaise, so I guess that makes it a salad.

Monday, November 24, 2014

Rustic Apple Cake


Lydia walloped half of this cake by herself. A 5-year old eating half an 8 inch cake!!!! Not in 1 sitting, but 2. One quarter during tea, another quarter for supper! GAWD! But she didn’t eat dinner. But still….. I allowed her, because.. it’s a not a sinful cake. I made this cake 2 years ago, and now she's 7.

Anne, she really loved this cake. Really did.


Friday, March 15, 2013

Apple Almond Buns - Fruity Buns #3


Remember I made apple butter some time ago?
The only person who enjoyed this spread was Lydia and I, the rest all went uuurrghhhh because of the cinnamon.

I still had some apple butter left and when I saw this recipe, I just gave it a go since some Aussie relatives will be here. They are used to eating cinnamony stuff since they have been there for decades. It'll be a good chance to make these since the others didn't like this spread. The relatives enjoyed the buns and I'm happy!


Friday, October 19, 2012

Soy Jelly with Roselle Poached Pears


I made this for Eat Tau Huay Day event on Facebook some time back.

Making this was supposed to be easy with store bought soy milk.. but long story cut short, I had a horrible time making this with sick kids in the house making me unable to get out of the house during day time to buy the soy milk and the beans.. sigh.... oversoaked cos I just can't squeeze the time to do it and sigh..... the GDL overcurdled and...... sigh........Rushing through desserts is never a good idea. It is a hobby done leisurely for fun, not a necessity.

Friday, August 31, 2012

Easy Pear Cake - Pear #3


  This cake is simple to make and delicious to eat. No fancy arrangement and all the pears are dumped into the batter. Generous and every bite is deemed to have some pear. You won’t feel the textural difference as the pears were soft after baking and yum yum.. delish! The cake is basically sweetened with pears and not sugar. I used only 50gm of sugar here and way lot more of pears.

Wednesday, August 29, 2012

Pear Pound Cake Gratin - Pear #2


Remember my Coconut Lemon Raspberry Perfect Party Cake? The original recipe didn't work well for me and boy was I glad when I saw this recipe on Helene's blog. Pound cake gratin! Perfect way to use up not so nice to eat pound cakes or butter cakes or similiar stuff.

Monday, August 27, 2012

Cinnamon Vanilla Poached Pears - Pears #1


I am beginning to love pears. I used to hate pears.

I never liked western pears. I have always preferred Asian pears that are juicy and very juicy. Western pears seems harder, sometimes astringent and more things that could end up sticking between my teeth. Maybe back in those days, there is only Packham pears available. Yes, those days when fresh lemons were unheard of. It's just calamansi or green limes available should one ever need some citric acid besides oranges.

Wednesday, July 4, 2012

Apple Butter - Let's Jam # 2


Made in Jan 2012

I bought some freaking cheap but ugly looking apples from the night market. They have streaks of brown on their skin, but when cut they look perfectly fine. And I have to clear the fridge or at least shrink my stock to make way for Chinese New Year. I didn’t really need these apples, but I can’t help but buy them because they were really cheap.

Friday, June 15, 2012

Apple Pear Millet Porridge - Baby Food # 3


Millet is another grain that is suitable for baby's consumption. It is easily digestable and high in protein, manganese, phosphorus and magnesium. Good for diabetics and is heart protective. Eating whole grains is also good for kids and toddlers to prevent childhood asthma. (source: WH Foods). I have also been told that millet helps promote good sleep.

Monday, April 30, 2012

Baked Apple French Toast - Eggy Bread #1


This week will be about 2 french toasts and 1 bread pudding.

So, anyone of you with a loaf of sandwich bread but don't know what to do with it, maybe you can try out this week's recipes to clear stock.

Friday, December 16, 2011

Wednesday, December 14, 2011

Autumn Chopped Salad - Pear Week # 2


There's no autumn here. It's summer whole year long, 365 days a year, oh next year will be 366.

Over the northern hemisphere, cranberries, pecans, pears and apples are in season few weeks back (some still are), and as usual, they land on our shores pretty much later. It may be Christmas soon, and it's usually associated with winter (but that's not the real thing anyway) so, it might be weird to serve an autumn salad with cranberries, pecans, apples and pears for Christmas, but then again, it's not really important because seasons don't play a major role here, except with the availability if imported fruits and vegetables. We just eat anything, anytime of the year.

Monday, December 12, 2011

Osmanthus Double Boiled Pears冰糖桂花炖梨 - Pear Week # 1


Recipe tried out in April 2011

Pears are everywhere now! I don't want to miss this period to post so that you may be able to try these out too.

This is one dessert that you can serve your guests if you’ve having a small scale entertainment with a Chinese menu. Looks beautiful when serve with stem still intact or sliced if you want.

Monday, February 21, 2011

Apple Yeasted Sugar Tart -Fruit Week #1

Sick of soup already? I'm going to drown you with fruits this week. *Evil look*


Apples. I bought 2 granny smiths 3 months back (post done in Sept 2010). Yes. And one was still with me after the apple crumble.
Then I saw on technicolour kitchen (again!!!!) , an apple yeasted sugar tart, and it looked so so appealing to me. I knew I will be having some cream after the birthday cakes and oh yes!!! I definitely will make this very soon.

Today I finally used the 3 month old apple, and it still looked fine, just like the way it was when I bought it. Hahah!! The wax really does a good job preserving the apple. Can I use the wax on my face???? Hahaha!!!

My oven is always too hot for breads made with milk. It always browns too fast when baked according to the instructions and I always, always have to do it at 150C, which is far far lower than recommended. And today is no different. How hot you need to bake this with, you really have to gauge it yourself. I gave you the original temperature, so make your own decisions.


Apple Yeasted Sugar Tart
Recipe taken from Technicolor kitchen who sourced from "The Cook's Companion"

245gm all purpose flour
1 Tbsp sugar
Small pinch of salt
1 tsp yeast
120gm warm milk
1 egg, room temperature
28gm softened butter
2-3 eating apples (I used 1 large granny smith, and it was enough)
67gm demerara sugar (I used a mixture of demerara with brown sugar, as I ran out of demerara)
120ml whipping cream (I was left with 100gm of it, just used this)

Method: If you think I'm being too long winded here, please check out Technicolor Kitchen's version. Hers is a lot more "compact"
1. Combine flour, sugar, salt and instant yeast together in a mixing bowl. Make a well in the center.
2. Mix milk and egg together and pour into the well.
3. With a spoon, try to bring the flour in gradually and form a dough.
4. When everything has come together, knead in softened butter. Continue to knead (I did this by hand), it is very soft and sticky at the beginning and knead it (by pulling the dough from the bowl and putting it back, and pull it away and put it back cos the dough is the soft tacky type) until it no longer feels sticky, and a smooth dough is formed. *I used only my right hand to knead and kept my left hand clean. I used my left hand to test the dough’s stickiness as the right hand is always covered with the glob of dough. When the dough is ready, you rub the dough off your working hand, touch the dough with your working hand and it should not stick too, but it will still be very soft.
5. Then cover and let it proof for 30 minutes. Meanwhile prepare a loose bottomed 9 inch tart pan. Generously butter the pan.
6. Punch down the dough and give it a 1-2 minutes knead. Let it rest for 5-10 minutes before flattening it into the pan.
7. Let dough in pan proof for another 30 minutes.
8. Meanwhile, peel and cut apple(s). When 30 minutes if up, the dough looks puffy. Press the apples in and sprinkle the demerara sugar onto the apples.
9. Preheat the oven at 200(fan)/220C, the tart will continue to proof until the oven is ready and bake the tart for 10 minutes. (I found this too high for my oven, I think I’ll do it at 180C next time, cos my tart was nicely browned at 8 minutes)
10. Meanwhile beat the whipping cream to soft peaks.
11. Remove tart from oven and spoon the cream over the apples.
12. Return tart back to oven at 180(fan)/200C (I used 150C only) for 20 minutes or until the base of the tart sounds hollow when tapped.
13. Remove from oven and transfer tart to cooling rack, remove mould and let it cool on rack.
14. Slice only when tart turned warm to touch, if not the cream filling will be runny.


Verdict:
Darn it. This tasted so good. The baked cream topping is super!!! I wanted to make another one the next day to bring to my mom, but I ran out of cream. I don’t want to buy another large carton, cos I won’t be around for days.
This is the perfect "bread" for lazy kneaders. Even with the short kneading time, I assure you that you'll get the soft bread fresh from the oven due to the moisture from the apple being baked in the bread. It's best eaten warm, but then, it's still not hard later. Well, not as soft as fresh and warm, but acceptable even to the next day, but please keep air tight.
But for those who are thinking of trying this out, I suggest you mix the topping sugar with some cinnamon or scraped vanilla. That’s the only miss about this yeasted tart, if not it’ll be perfect!!!

Tuesday, January 11, 2011

Apple Crumble Cake


This cake, was made with an apple (yes, just one large Granny Smith) that has spent 3 months in my fridge, hahahah!! FYI, it wasn't wrinkly, but still smooth skined.
I just threw in whatever I wanted to make this cake. And it was really good.

Just one thing, the crumble was too little, but luckily I didn't make too much as it was sweet.
Feel free to add more flour and butter to the crumble mixture to bulk up.

The crumble softens the next day, so this cake is best eaten fresh from the oven when the crumble is still crispy.

Apple Crumble Cake
Recipe source: Wendyywy

80gm butter
80gm sugar
½ vanilla pod, seeds scraped
2 eggs
3 Tbsp grated green apple
150gm all purpose flour sifted with ½ tsp baking powder and 1/8 tsp baking soda
100gm diced green apple (abt 1cm big)

1. Preheat oven to 160/180C. Line a 8 inch square pan.
2. Cream butter, sugar and vanilla until light and pale.
3. Put in one egg, and beat until it is well emulsified (it’ll look like buttercream), scrape the sides , then add the 2nd egg and beat for another 30 seconds.
4. Put in grated apples and beat for 5 seconds.
5. Put in half the sifted flour and beat for 10 seconds, scrape the sides and put the the balance of flour and beat until well mixed and smooth.
6. With the mixer off, with a spatula, fold in diced apples.
7. Spread the batter onto pan and level it.
8. Sprinkle crumble topping on top and bake for 30 minutes until surface of cake is golden brown.

Crumble topping (Make more if you find mine to be sparse, of which is yes, but it’s just nice for me)
2 Tbsp brown sugar
3 Tbsp all purpose flour
15gm butter
And a bit of vanilla seeds from above (or substitute with ¼ tsp cinnamon powder)
Rub everything together until it resembles crumbs


Saturday, October 23, 2010

Apple Banana Coffee Cake with Chocolate Chip Streusel


The original recipe seemed huge, so I halved it. And I saw another blogger, Kristy using apple in this, so I followed suit, to add an apple to the batter. This recipe has been made by a lot of bloggers, just by googling you can find loads of them, but google without the apple word to find try-outs with the original recipe.

Coffee cakes are cakes that are meant to be eaten with a cup of coffee, due to the sweetness, and they usually comes with streusel topping. So, don't be looking through my recipe searching for the coffee ingredient. No, it is non existent.

Very nice cake, the streusel’s great. Get a cup of coffee with this , yea!!


Apple Banana Coffee Cake with Chocolate Chip Streusel Recipe
Recipe adapted from Epicurious who adapted from Bon Apetit Magazine

Cake batter
100gm all purpose flour
1/3 tsp baking powder
1/3 tsp baking soda
60gm butter
50gm brown sugar
1 egg
150gm banana (weighed without skin), mashed
1 green apple, peeled, cored and sliced thinly.

Streusel mixture
50gm brown sugar (can be reduced to 30gm)
50gm walnuts, chopped
½ tsp cinnamon powder (you can put more if you like, but as usual I always greatly reduce this)
80gm chocolate chips (I used half white half milk choc)

1. Preheat oven at 170/180C. Line a 8 inch round pan or a 7 inch square pan. (a 7 inch round pan will be fine too, as my 8 inch round only yielded an 1.5 inch cake.
2. Sift flour, baking powder, baking soda together. Mix in salt, set aside.
3. Prepare streusel mixture by mixing all of the ingredients together.
4. Cream butter and sugar until light and fluffy.
5. Add in egg and beat until well combined, it may look curdled.
6. Put in bananas and mix.
7. Put in the flour mixture and mix until well combined. It looks rather thick.
8. Put half the batter into pan, and level the batter. (the batter don’t seem to be a lot, but don’t worry, it’s enough to be spread around the pan)
9. Arrange half the apple slices onto batter and top with half of the streusel mixture.
10. Dollop the remaining batter by the tablespoons into pan, try to put the dollops evenly spaced out on the first layer of streusel. Then use a spatula to even out(press and spread) the dollops of batter. (This step is a bit tricky because the streusel from below tends to come up and stick to the upper layer of batter.)
11. Arrange the remaining apple slices and top with remaining streusel mixture.
12. Bake for 30 minutes or until tooth pick come out clean.

****The batter may look thick, but the cake is soft and fluffy.

Tuesday, September 28, 2010

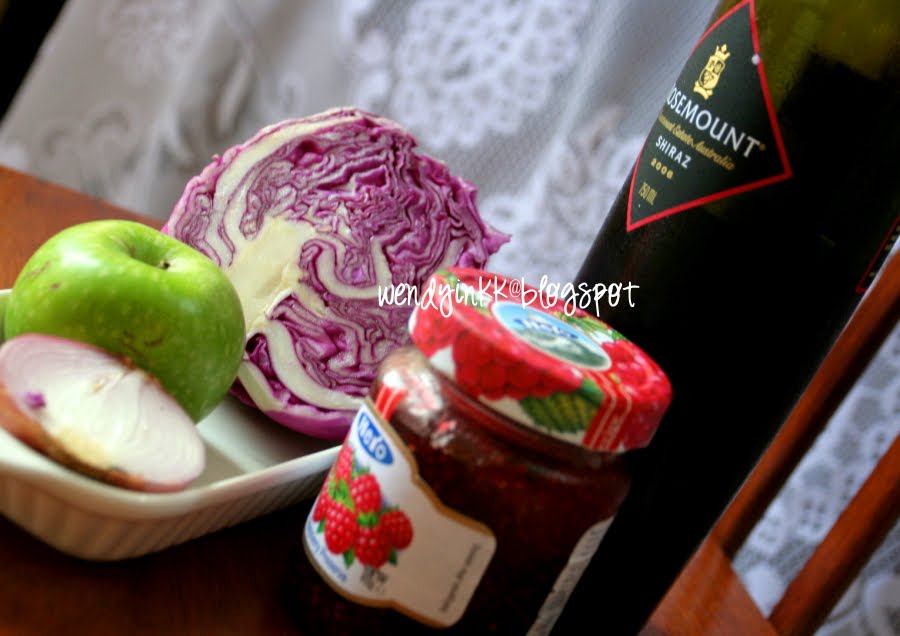
Braised Red Cabbage with Apple and Red Wine


I bought some red cabbage and I want to find new ways to cook it besides salad or simple garlic stir fry.
So, I think there might be some braised cabbage stuff online and searched. Indeed, there are many braised cabbage recipes, even Jamie Oliver has one, but I don’t have bacon , so I can’t use his.

Then I saw this recipe. Ok, it sure does look interesting, and I have jam, wine, apples… Ok, all set. I adapted the recipe with some changes. I didn’t use any spices at all, because I’m afraid Mike won’t like it. And I reduced the sourness and therefore had to reduce the jam used. Overall, it’s still quite similar. You may try the original recipe if you like spices.

Braised Red Cabbage with Apple Recipe

300gm red cabbage, sliced
1 medium sized green apple (about 110gm), peeled and grated. Discard core after finished grating
Half red onion, peeled and sliced
1 Tbsp butter
1 Tbsp rice vinegar (I reduce a lot of this, because Mike doesn’t like anything sour. But this is essential to retain the colour of the cabbage)
2 level Tbsp raspberry jam (best is lingonberry jam or red currant jam)
80ml or 1/3 cup red wine
1/3 tsp salt and pepper to taste
another 1 Tbsp butter (to be used at the end of cooking)

1. Put onions and butter into a saucepan and cook until onion softens.
2. Put in sliced cabbage and grated apple. Immediately put in vinegar, then only stir.
3. Put in raspberry jam, red wine, salt and pepper to taste. Stir until well combined. Bring to a boil.
4. Put lid on and simmer for 30 minutes (time is much shorter due to much lesser amount)
5. Stir in butter and turn off the heat.


After doing seeing the recipe, I did some reading online and found that the red pigment in red cabbages can be used as a PH indicator. Just incase you do not know what is a PH indicator, it means, the colour can detect whether the solution it is in is acidic or alkaline. It turns bluish green in alkaline and reddish when in acid. Which is why you must put in the vinegar as soon as possible after you have put the cabbage into the pot.

Read :
Red cabbage contains a pigment molecule called flavin (an anthocyanin). This water-soluble pigment is also found in apple skin, plums, poppies, cornflowers, and grapes. Very acidic solutions will turn anthocyanin a red color. Neutral solutions result in a purplish color. Basic solutions appear in greenish-yellow. Therefore, it is possible to determine the pH of a solution based on the color it turns the anthocyanin pigments in red cabbage juice .
Adapted from here

The braised cabbage is really nice to eat. The alcoholic smell of the wine is no longer there after braising. The smell of the jam is really nice and it really marries well with the vinegar. The cabbage is not too mushy. It still has a crunch to it because of the vinegar. This tasted like something I had in Shangrila Hotel, Kuala Lumpur. The international buffet serves some German roast beef and had some cabbage served with it, but it’s not red cabbage, just the usual cabbage, but it sure was almost like this, sourish, sweet and fragrant. Nope, it’s not sauerkraut as that is salty. I think this is called Blaukraut or Rotkohl in German.

A fresh change to the usual salads or Chinese stir fries. I do recommend you try this out if you like sweet and sour stuff.

And a reminder to do all measurements with measuring spoon, just incase you used the rice eating spoon. Because 1 rice spoon of vinegar is much much lesser compared to if you heaped the jam with the same spoon.

Wednesday, June 2, 2010

Upside Down Apple Sponge with Demerara Caramel


I saw this recipe online for more than almost 2 years, and never attempted it because I could not find demerara sugar. And I finally got my pack of demerara sugar at Jusco’s organic shelves. Actually, the Chinese herbal shop which is walking distance from my house also had it!!! Darn! Stupid me.

First bite: So sweet!!!! Urgh
2nd bite: hmmm….the cinnamon is good… caramel is yummy
3rd bite: I’m in heaven………..
This is my ultimate comfort food. I really felt "uummmm" when I ate this, my mind just went bumping on the clouds...

That was me, only me.

Mike didn’t like it, due to the cinnamon, so did the rest of his family. The caramel was so good with the cinnamony apples…. 1 slice is not enough for me. I want to have more..but it was too late, those who ate the rest of the cake somehow scraped the top away…………Wasted!!!

I adapted the recipe by avoiding the ginger and cinnamon in the cake, even the cinnamon on the apples were too much for Mike’s family, but I love it. I only made half the caramel in the recipe, and it’s enough for me. I don’t know how to eat an overly sweet cake. MIL asked me to make it next time totally w/o cinnamon.  The next time I did it the same way, but she ate all of it.


Apple Sponge:
1 Tbsp softened butter
2 Granny Smith apples, peeled, cored, halved, thinly sliced
½ tsp cinnamon powder
120gm demerara sugar (pulsed to a finer grain, use 2 Tbsp of this to toss the apples)
4 large eggs
100gm cake flour, sifted together with ½ tsp baking powder
60gm butter, melted
1 tsp vanilla essence

Demerara Caramel:
125ml or ½ cup heavy/whipping cream
100gm or ½ cup demerara sugar
½ tsp vanilla essence
1/8 tsp salt (makes the caramel oh-so-much better)

1. Preheat oven at 180C or 170C (convection)
2. Generously butter a 9 inch baking dish with butter.
3. Toss apples with 2 Tbsp of pulsed demerara sugar and ½ tsp cinnamon powder. Arrange nicely on the buttered dish.
4. Beat eggs with the rest of the pulsed demerara sugar until thick and pale, abt 5-7 minutes on high speed.
5. Fold in sifted flour in 3 additions until no lumps are seen.
6. Fold in melted butter and vanilla essence.
7. Pour batter over arranged apples.
8. Bake for 30 minutes or until toothpick comes out clean.
9. While cake is baking, cook on medium heat cream, sugar, vanilla and salt until it boils, and continue to cook on med low heat maintaining a rolling simmer until mixture visually looks thickened, about 6-8 minutes. Remove from heat and leave to cool slightly while waiting for the sponge to be ready.
10. When sponge is baked, remove from the oven, and loosen the sides with a sharp knife.
11. Overturn cake onto a plate and pour warm caramel over cake.

Serve cake warm.


The rest of the pictures are my 2nd attempt and only this pic is my first attempt with the cake. I didn't like how the 1st attempt pictures came out because I haven't discovered natural light photography :) The bounced flash were too much for the caramel.

Thursday, February 18, 2010

Apple Granola Muffins


Hi everybody!! I'm back from my Lunar New Year eating, binging and every thing gluttony related.

This post is almost 9 months back :)
I haven't been posting this one up because... I was posting others.

If u have been reading my blog for a while, u'd realise I don't bake much healthy stuff :) Those fibre rich, low sugar or whatever... cos really I don't eat much of those. But I love oatmeal (my way) and muesli bars.
This apple granola muffin is one of those rare things :) I forgot where I took the recipe, it's been ages.

Apple Granola Muffins recipe

(A)
160gm all purpose flour
1 tsp sodium bicarbonate
½ tsp cinnamon powder
110gm granola /muesli mix
80gm brown sugar
½ tsp salt
-Sift flour, soda bicarb and cinnamon powder. Then combine with the rest of ingredients A

(B)
2 large eggs
180ml milk
1 tsp vanilla essence
80gm melted butter (after melted, use 2 Tbsp of the melted butter for the topping, use the remaining butter for the batter)
-Combine everything together.

3 medium sized green apple (granny smith), abt 400gms
Peeled, cored, and diced 1cm cubes.

Topping (this is the thing that makes it so delicious)
2 Tbsp rolled oats
2 Tbsp brown sugar
2 Tbsp flour
¼ tsp cinnamon powder
2 Tbsp of melted butter (from above)
-Mix everything except butter. When the dry ingredients are well mixed, put in butter to form crumbs.

Final Assembly
Preheat oven at 170/180C.
Put (A) into a mixing bowl, make a well in the centre. Pour in ingredients (B) into the well and mix until just combined. Put in apples. Combine with the batter. Spoon batter into 12 muffin cups and sprinkle topping on top. Bake for 25-30 minutes.

Printfriendly

Related Posts Plugin for WordPress, Blogger...