New Youtube Channel

Now that my home's internet speed is upgraded, I can make more videos!
This is my new channel https://www.youtube.com/channel/UCgW4rIH3Gg6Lc8v4G0QlqgA
Please subscribe!

Showing posts with label Mother's Day. Show all posts

Sunday, May 13, 2012

Off Day, I wish! - Random Sunday

Break Day!
My Off day,

Fat hopes.

Still have laundry to do
Still have diapers to change
Still have kids to bathe
Still have baby and kids to feed

I wish it's really an off day!

But, one happy thing to share.
Lydia tried to surprise me with this card she coloured in school.
At least one trait she didn't inherit from the old fashioned papa.

I was bathing and she put this card secretly somewhere where I will definitely see when I come out from the shower.
Sweet.... isn't it?


To all mothers and grandmothers out there
Happy Mother's Day!


Tuesday, May 11, 2010

Japanese Cotton Cheesecake with Fresh Fruit Topping


My mother in law is back to the States... just few days back. Can't wait for her return, so that I can get more stuff :) 
And the night before she left, we had a simple Mother's Day celebration at PhongMun Restaurant Sg. Siput.
Ate 6 dishes and a cheesecake for dessert.

I knew she loves fruits, and cakes with fruits will be a lovely choice for her. And she has told me before she don't like canned peaches. I don't want to make a vanilla sponge to go with the fruits, that will be so ordinary. So, I thought and thought, what should I do for the base? Oreo Crust with no bake oreo cheesecake, or oreo crust with baked cheesecake, or sponge (Duh!!!! ). Baked or no baked oreo cheesecake will be too heavy for Mike's family who are not fond of desserts right after meals. And then I saw on Blessed Homemaker's , she made a Japanese Cheesecake. Yeah, that type of cheesecake will not be heavy, but nice enough not be boring. So, I took out my favourite cheesecake cookbook and tadah!!! There is the recipe and I have everything on hand.

Adapted from Alex Goh's Fantastic Cheesecake.
I didn't want to do it in 2 ovals, so I only made 75% of it and did it in a 8 inch round. I got a 2.5inch cake in the middle and a 2 inch on the sides and that's after it has shrunk. Oh yes, this cake will shrink, Alex said it will and it did, so don't fret about it being shorter than when it was fresh out from the oven.

Japanese Cotton Cheesecake Recipe
125gm cream cheese
90ml milk
15gm butter

30gm flour
24gm cornstarch
3 egg yolks

3 egg whites
pinch of salt
1/8 tsp cream of tartar
75gm sugar

Topping:
1/2 tsp gelatin
1 Tbsp water
150ml whipping cream
2 tbsp sugar
Mixed fresh fruits, mango, strawberries, kiwifruit and blueberries
1 Tbsp instant jelly
100ml water
1 tbsp sugar

1. In a heavy saucepan, cook cream cheese, milk and butter until thick and smooth. Set aside.
2. Preheat oven at 160C. Boil some water.
3. After the cheese mixture has turned warm and mix in both flours. Stir with a whisk until smooth.
4. Put egg yolks into the cheese mixture and stir until well combined.
5. In another clean bowl, beat egg whites (+ salt) until frothy. Put in cream of tartar and beat until soft peaks, add in sugar gradually and beat until stiff (soft droopy peak that will hold its form).
6. Fold 1/4 of egg whites into cheese mixture, and then another 1/4 of the egg whites.
7. Pour the cheese mixture into the remaining egg whites and fold.
8. Pour batter into a lined pan (you can just line the base and grease the sides, it's not a must to line the sides as well. Springform or regular pan will be fine, but spring form's base must be wrapped.)
9. Place cake pan into a slightly bigger, shallower pan. Fill the bigger pan with boiling water and put in oven to bake at 150C for 45 minutes.
10. Unmould cake immediately upon removal from oven, if not, the cake will shrink a lot. (If you're using a regular pan you can release the sides by running a knife between the cake and pan, and leave the cake in the pan to cool down).

To make topping
1. Put water into a heatproof bowl. Sprinkle gelatin onto water. Wait for 2 minutes. Either heat it by double boiling or zap it in the microwave on high for 25 seconds. Leave gelatin mixture to cool down totally.
2. Freeze mixing bowl and beaters for 5 minutes. Remove mixing bowl and pour in cold whipping cream.
3. Beat whipping cream until visible streams can be seen. Pour in cooled gelatin mixture and sugar and beat until stiff peaks. Do not overbeat.
4. Mound whipping cream onto cooled cake. Top with diced mixed fruits. Chill cake in freezer for 10 minutes while you make the jelly topping.
5. Put water and sugar into a small saucepan, on medium heat, bring to a boil. Put in instant jelly powder and stir until fully dissolved.
6. Remove cake from freezer and glaze fruits with instant jelly solution. The jelly will firm up upon contact with the cold fruits.
7. Return cake to fridge and chill for another 2 hours before serving.


Verdict: Mother in Law was happy to see the cake and took pictures of it. She loved the cake, saying that it was cheezy but light. The cream with fruits add a nice touch to it. Everybody who ate this cake, although full with rice, still found this cake to be nice. Hehehe... sometimes when things only seem tasty when you are hungry, it might not be tasty at all, just because you are hungry. But when things still seem tasty when you are full, you can guess how nice it is :)


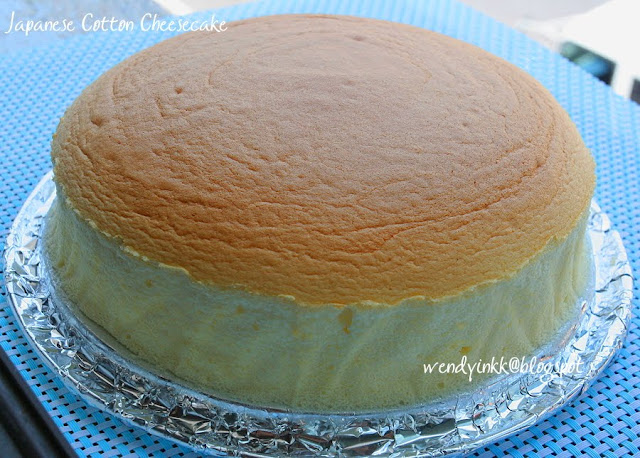
Cheesecake

Thursday, May 6, 2010

Chocolate Strawberry Yogurt Cake


This is only for 2 mini cakes , one for mama and one for papa. Must serve one to papa, if not he will be jealous. But make the one for mama extra special, maybe with extra strawberries. There is no cream here, so it is perfect for senior citizens who are careful about what they eat and this is definately not cloying but very light. :)

I made created this for someone I knew, who totally not well versed in cookery terms and rarely goes in the kitchen. For this year's Mother's Day, she wanted to make something for her mom, and tried out my Castella cake. Gosh, of all the cakes she wanted to do, she did a castella. Well, it didn't quite work out. With her determination and filial piety to make this day a special day, I decided to help her out a bit by making this cake for her reference. This is actually very easy but definitely will be long winded with the instructions, need to give very very proper elaboration, like what the Chinese say, "draw a picture that even shows the intestines". Please bear with me :)


To make the disposable cake ring and cake cutter
(You can skip this and use a pretty short glass to do this. Just use the glass as your cake cutter and the glass to serve the cake in it)

Stuff that you need:
8X30cm manila card, 2 pieces
Some plastic wrap or just cut from a plastic bag, bigger than the manila card 1inch on all sides
Or you can just use those plastic sheets used as binding covers and skip the manila card
Some cellophane tape
1 empty drink can
Marker pen
Blade Cutter or scissors

1. Wrap manila card strip with plastic wrap, secure with cellophane tape. (skip this step if using those plastic sheets)
2. Wrap manila card around empty drink can. Mark the spot where the card ends. This is the first mark. Make another mark 2-3mm after that first mark. This is your second mark. Remove from can, while retaining the curl. Move the end of the card to the second mark and secure it with cellophane tape. Cake ring is ready.
3. Place pen or pencil on a book about 1 inch thick.
4. Place can next to pen/pencil and turn the can (make sure base touches the table at all time), so that the pencil can make a line around the can.
5. Make an incision into the line using blade cutter. Cut along the line, make sure the line is on the shorter side, so that when you’re done cutting, the line is no longer there. Trim with sciccors.
6. There, you cake cutter is ready.

Making Temporary Cake ring

Making Temporary Cake cutter


Cake and fillingChocolate cake, any chocolate cake you enjoy eating, you only need four pieces of 1cm thick cake., Silverbird or any other dark moist chocolate cake will be fine.
140ml strawberry yogurt (single portion cup), I recommend Dutch Lady. Taken out from fridge 20 minutes before use, if this is too cold it will not give you a good smooth mixture with the gelatin later.
1 level tsp gelatin (measuring teaspoon)
2 Tbsp water (2X15ml), please use measuring tablespoon
1 level tsp sugar, or more
Some strawberries for decoration

1. Put 2 Tbsp of water into a ceramic rice bowl or any heatproof bowl, stainless steel also can.
2. Sprinkle the gelatin over the water. Let it sit for 2 minutes.
3. Heat a pan of water, the water should be about 1 inch in height, bring to a simmer. On low heat, place bowl of gelatin into pan and heat the gelatin mixture until the gelatin melts. You will no longer see any grains of gelatin. Remove bowl from pan. Lightly stir it with a teaspoon so that the melted gelatin will be evenly dispersed in the liquid. If you need sugar, put it in now and gently stir.
4. Let gelatin mixture cool down, you should no longer feel that the bowl is warm.
5. While waiting for the gelatin to cool down, cut your cake with the drink can. Cut 4 circles of cake
6. Place cake rings onto a plate lined with baking paper or plastic wrap. Put one piece of cake into each cake ring. The cake should not feel loose in the ring. It should be nice and snug. Now back to the filling…..
7. Stir the yogurt to even it out. For right handers, with yogurt on your left hand and a spoon on your right, pour the yogurt into the gelatin mixture (Do not scrap the yogurt cup, have to be fast here) and quickly mix it. After you have mixed it, only then you scrap the yogurt cup clean into the gelatin bowl and mix again.
8. Pour 2 heaped teaspoon of yogurt onto each cake in ring. Place the 2nd piece of cake over yogurt in ring.
9. Pour the balance of yogurt into cake ring. Level the surface.
10. Place plate of cake into the freezer for 30 minutes (not more than this) or chill for a minimum of 2-3 hours. Overnight will be even better.
11. Transfer cake to serving plate.
12. Use a sharp blade cutter, cut the sticky tape to release cake ring.
13. Top with a chocolate coated strawberry, or a plain one, up to you.

Melting gelatin

Cutting Cake


Preparing the filling


Cake Assembly

Final touches, before serving


To make chocolate coated strawberry
Some cooking chocolate or some eating bittersweet chocolate will be fine
Cold strawberries

In a rice bowl, pour some boiling water, halfway up. Place another slightly bigger bowl (with chocolate in it) over the bowl with hot water. Let it sit for 1 minute. Then stir with a spoon to make sure the chocolate has melted. Dip strawberry into chocolate and let the chocolate harden.


And this final picture, the yogurt is actually frozen in heart shaped moulds, instead of made into jelly

Sunday, May 24, 2009

Fruit Ring Cake 水果圈蛋糕


My brothers and I usually celebrate Mother's day late, because on the actual day, eateries are crammed with families celebrating their mothers. We did it yesterday, and I made this cake for my mom.

It's an orange chiffon cake with canned peach, fresh kiwi and strawberries. The fillings consist of the same fruits aranged in the same order.

Mom liked the cake.... well, my mom likes everything I bake for her. She loves all my bakes, just the way she loves all of me.


Monday, May 11, 2009

Pandan Layer Cake 香兰蛋糕


Made this cake for my Mother in Law (MIL) for mother's day.

I first made this cake by experiment many many years ago, using green bean flour for the jelly and a packaged sponge mix for the cake. The green bean flour solidifies way too quickly for me to spread this evenly. So, this time I changed it to agar-agar with cornstarch. I think I put in too little cornflour as the mixture wasn't thick enough, and my cake floated (I assembled it upside down). Do double** the cornstarch if u want to try making this cake.

The result.... taste, yummy.
Looks.. decieving! Cos the floated cake was hidden by the curve of the plate. kekekeke!!!!
BTW, my daisies are ugly! I seriously am thinking to take up a cake decorating course!

Sponge:4 large eggs (250gm shells on)
130gm sugar
100gm flour + 1/2 tsp baking powder, sifted
50gm coconut milk
80gm corn oil
1/2 tsp pandan paste.
Green food colouring

1. Preheat oven to 170/180C.
2. Beat eggs and sugar until thick and pale.
3. In a seperate bowl, combine coconut milk, pandan paste/green colour and corn oil. Put in sifted flour and mix.
4. Put a few table spoonsful of beaten eggs into (3) and fold. Repeat 3X.
5. Pour (4) into remaining beaten eggs and fold. Take care not to deflate the eggs.
6. Pour into prepare mould and bake for 30 minutes.
7. Remove cake from mould immediately when baked. Leave to cool (cake will shrink tremendously, but uniformly) and slice into 3 layers. Freeze (air tight and separate layers with baking paper) until use.

Pandan Layer
1. 2 cups water + 200gm sugar. Cook sugar until dissolved. Leave to cool down. Do this in advance.
2. Mix 50gm cornstarch (update : 75gm gives better results) and 1 tsp pandan paste into 150gm coconut milk. Set aside
3. Bring 2 cups water + 1 tbsp agar-agar powder to a simmer.
4. Pour in (2) into (3) and cook until mixture thickens and boils. Remove from heat.
5. Pour (1) into (4) and combine well.

To assemble:
It depends on the mould u use. If u want to assemble it upside down, then put 1/3 of the pandan layer in first, then cake, then another 1/3, then 2nd layer cake and the last 1/3 of pandan layer and last layer of cake.

If u want to do it upright, then cake in first, then 1/3 pandan, then 2nd cake and pandan and cake again and pandan layer.

Chill in fridge til cold and set. Decorate with some icing and dessicated coconut.


** I tried doubling, but it was too thick instead. 50% more will be good enough.

Printfriendly

Related Posts Plugin for WordPress, Blogger...