New Youtube Channel

Now that my home's internet speed is upgraded, I can make more videos!
This is my new channel https://www.youtube.com/channel/UCgW4rIH3Gg6Lc8v4G0QlqgA
Please subscribe!

Showing posts with label Dairy-Condensed Milk. Show all posts

Friday, February 21, 2014

Serradura 木糠布丁 - AFF HK Macau Desserts #3

These are set in Ikea's tealight cups

Serradura, also known as Sawdust pudding is a Portuguese dessert popular in Macau, the former Portuguese colony.
Why the name sawdust? The cookie crumbs that make up this pudding is the sawdust. :-)

I first got to know of this dessert from a TV documentary. The host visited a dessert factory in Macau and was taught how to make this simple dessert.


Monday, November 14, 2011

Torta Dulce de Las Tres Leches - DDL Week # 1


Recipe tried out in March 2011.

Long fancy name huh, LOL. Simplified, translated it's a 3 milk cake with Dulce De Leche. Refer here if you want to make your own DDL.

I modified the recipe from Rose's Heavenly Cakes. I love the idea of a sponge soaked in milk, muahahahaha! So so sinful. Usually this cake is soaked with evaporated, fresh and condensed milk. But Rose's version ditched the evaporated milk and used cream. I love cream!!!! And I on ther other hand ditched the condensed milk and used DDL. Muahahahahah! I think by now non dairy lovers would have scrammed from my blog.

Wednesday, May 18, 2011

Hannah's 2 Minnie Mouse Birthday Cakes - Cheesecake Trio #1


I made 2 cakes for my dear niece to be cut n day 1 and day 2 of Chinese New Year.
She requested for a Minnie Mouse cake and gosh, a Minnie Mouse cake? She must have caught the bug on her trip to Disneyland last Nov. I turned down her request as I can't figure out how to do that just before CNY. As you all know, fridges are stuffed so so full during this period that keeping a cake with cream in a stuffed full fridge is CRAZILY difficult.

But I felt so bad letting her down. Really felt so so bad. So I googled for Minnie Mouse cake and then I got the idea of instead of making Minnie's face, I could just use her trademark, polka dot ribbons as my deco theme. And use chocolate cut outs to make the Minnies. The cut outs have no facial features, but with those ears and ribbons, no one couldn't recognise it's not Minnie. And further more, she has told me before she loved my Strawberry Mirror Cake and would want to have it again this time, and I also turned her down because I don't want to make repeating cakes for the same person. Well, this request was 2 months before the Minnie request. So, I made up my mind to make 2 cakes for her. One oreo cheesecake to be cut at my mom's and the strawberry mirror cake to be cut at my sis in law's parent's house, since they've never had this cake before. A pink cake is perfect for Minnie. Both are gelatin set cakes, as I didn't want to do frosting and worry about getting them smudged when I shove them into the stuffed fridge. Cake rings are there for a purpose. : p

I went around town scouting for suitable ribbons. It was only at an old shop that I could get it. Those popular fast moving art and gift shops carry only the latest designs and these polka dot stuff are infact, quite old. I've been seeing them around since my school days!!! I finally found one that is suitable.

For the Strawberry Mirror Cake, instead of having the mirror on top, I set the mirror on 2 separate pans.
When they were set, I half froze them. Then I made the bavarian cream filling and sandwiched the mirror layer between the bavarian cream. So altogether there was 3 layers of cake and 2 layers of mirror sandwiched with bavarian cream. Haha, if you have no idea, this is the layout from bottom to top:
Cake, Cream, Mirror, Cream, Cake, Cream, Mirror, Cream , Cake, Cream.
I planned to do white polka dots for the cake, Minnie's trademark, but then I was too tired to do that step. A choc cut out is good enough, Haha

I can't get a picture of the interior as the I didn't see the cake being cut. But the reviews I got was that it was fabulous! Yeah with almost 1kg of strawberries in that cake, how can it not be fabulous! Haha. But the actual fact is that, it's not a common cake. The relatives on my SIL's side have never eaten such a cake, and some of them requested for the recipe.


Ok, now about the Oreo Cheesecake. Well, don't know why I came up with the idea of using Oreos and stacked them to make the cake. But then, initally, I wanted to do a dome with Minnie's ears and ribbons on top. Which was why this cake was so short. But in the end, I ran out of cream. I didn't want to do an empty dome, was worried it'll soften and collapse during the 1 hour journey from KK to Kampar, so, no cream, no filling, no dome, no Minnie ears and ribbon. In the end, I made cut outs and hand sewed the ribbons. I didn't have proper Minnie cookie cutters and had to make do with my bear cookie cutter. The ears where smaller than Minnie's but no one realised it until I told them, it's actually a bear's cut out, not Minnie's. It was totally acceptable for those who saw the cake. Hahaha!! That means, the ribbons did a very good job in portraying Minnie.


I concocted my own formula for this cheesecake, threw in whatever I fancy and used lots of oreos for some stacking effect. I could only do 3 layers as that was all the batter that I have. If I used a smaller cake ring, then I could do more layers.


Oreo Stacked Chilled Cheesecake
Recipe Source : Wendyywy

250gm cream cheese, softened
100gm sweetened condensed milk, room temperature
1 tsp vanilla extract
300gm whipping cream, cold
1 Tbsp + 1tsp gelatin
50gm water
3 tubes of Oreo (more or less)

1. Separate oreo cookies. Discarding all the cream except for 25 pieces of halves.
2. Finely mill the 25 pieces of cookie halves with cream.
3. Press the milled cookie crumbs into a cake ring on a cake board /springform pan. Keep chilled.
4. Put water into a heat proof bowl and sprinkle gelatin over the water. Let the gelatin sit for 2 minutes. It will bloom. Then melt the gelatin either in the microwave (30 secs on high) or over another bowl of boiling water. (method seen here). Let it cool down.
5. Beat cream cheese until smooth and put in condensed milk and vanilla and beat again. Beat in gelatin solution until just combined.
6. In another clean bowl, beat cold whipping cream until soft peaks.
7. Fold the half the cream into the cream cheese mixture using a large whisk. Repeat with balance of cream.
8. Put in slightly more than half cup of cheese mixture into prepared pan. Spread it out. Arrange oreo halves (no cream) all over the cheese.
9. Repeat step 8 twice. You’ll have 3 layers of cookies.
10. Gently pour all the remaining cream cheese over the cookies and level the “cake”
11. Put into fridge to chill for at least 5 hours before unmoulding.


The Minnies were all ripped off by the kids.


Tuesday, February 22, 2011

Orange Cheesecake with Kumquat Compote


When I saw this cheesecake on Zurin's blog long ago, I fell in love with the kumquat crown. It looked so pretty. When I saw kumquats in Ipoh's Jusco, I had to get my hands on some. It's not expensive, at less than RM4 per punnet.

I didn't want to do a rich rich cheesecake that'll take up few blocks of cream cheese. I always prefer light creamy cheesecakes. No, this is not as light as featherlight cheesecake or Japanese Cotton Cheesecake. This is still creamy but not that, that rich. I want to eat cake, not lick on cream cheese. And I also have little bit of cream left from my pineapple tarts and Minnie Cakes (not sure when I'll be posting them, as I'm going themed now), and a opened can of condensed milk. Might as well utilize them.

Well, yeah, this is another dump in cake. Hey, I don't simply dump in things. I do calculations in my brain before I dump them in. How much aeration I want, how sweet and milky I want the cake to be, how firm I want it. I never just throw things in before giving it a second thought. Never. Ingredients are too expensive to be wasted.


Kumquats are a nice fruit to be incorporated into CNY.
So, if you ask me, Is this fruit common?

Well, when I was a kid, my neighbour bought two kumquat trees for CNY, and I asked him , why is the lime so funny, it's oblong rather than round. He said, oh, it's a new variety. Darn, he doesn't know it's a Kumquat 金橘. So, I bet most of you have seen this somewhere in someone's home, or even your own home, but have no idea, this is the kumquat that I'm talking about. It's a longish oblong lime lookalike that has no flesh. The fruit can be eaten whole. Just pop it into your mouth and chew away.

So, who were the eaters of this cake. Don't ask Mike. He didn't even catch a glimpse of this cake. I made this for my friends, that I met up on Day 4 of CNY. They cleaned up the pan very quickly. I never knew kumquat compote tasted so good. I used less sugar than found in online recipes because I found my kumquats to be on the sweet side, rather than being tart. I'm not going to keep the compote at room temperature for ages, so, why use so much sugar? Now with this ratio that I formulated for sweet kumquats, it's just nice for me. Like a light marmalade. The cake may be sweet on first bite due to the compote, but as you go on, it'll be fine. No one complained, but asked for seconds


Orange Cheesecake with Kumquat Compote
Recipe source: Wendyywy

250gm cream cheese, softened
125gm sweetened condensed milk
60gm whipping cream
1 egg
20gm corn starch
40gm cake flour (All purpose should work fine here too)
1 Tbsp (packed) orange zest
60ml fresh orange juice
2 egg yolks
2 egg whites
¼ tsp cream of tartar
30gm sugar

1. Prepare and line a springform pan. Wrap pan with aluminium foil to prevent water from seeping into the baking pan. Refer here if not sure how. Prepare a pot of boiling water. Place pan into a slightly larger pan. Preheat oven to 130C(fan)/150C
2. Sift cornstarch and flour and set aside.
3. Mix orange juice and egg yolks, lightly beat for a while and set aside.
4. With a whisk or large spoon, beat cream cheese until smooth and put in condensed milk and mix until smooth. Put in whipping cream and beat until smooth. Put in egg and beat until smooth. Put in sifted flour and mix until smooth. Put in orange juice mixture and and zest and mix until smooth.
5. Beat egg whites until frothy. Put n cream of tartar and beat until soft peaks. Put in sugar gradually and beat until stiff, and the peaks are softly hooked when whisk is turned upright.
6. Fold half of the beaten egg whites into the cheese mixture. Repeat with balance of whites.
7. Pour batter into prepared pan and put the whole set of prepared pans into the oven. Pour boiling water into the outer pan until it’s at least 1/3 the height of the inner pan.
8. Bake for 1 hour. Cool cake in oven (door ajar) for half an hour. Remove cake from oven and cool down totally. Chill in fridge for 5 hours before serving. With a skewer/toothpick, poke cake to create at least 30 holes absorb the syrup from the compote.


Kumquat Compote
250gm kumquats
125gm sugar (use more if kumquats are tart)
125ml water or more

1. Slice kumquats about 3mm thick. Remove all the seeds
2. Place all the prepared kumquats into a saucepan and put in water and sugar.
3. Cook on medium low heat until all the kumquats turn translucent. If it's too dry, add a bit more water.
4. Arrange warm kumquat slices over cheesecake and brush remaining syrup over kumquat slices.


Pictures of cheesecake taken with my Sony Ericsson TX5, not as good as usual, right?

Friday, December 10, 2010

Dulce De Leche Ice Cream


Oh yes... I made this again. I mean, I made Dulce De Leche again.

This time I used Sweetened Condensed Filled Milk, of which is inferior than Condensed Full Cream Milk, but definately better than  Condensed Creamer. If you ask me to compare the taste, definately the real thing tasted better. This looks like it, but taste wise.... hmmph... not there. Maybe 70% there. But better than nothing. Oh ya, if you want to know what brand I used, F&N's Sweetened Condensed Filled Milk, so far, I've only seen it in supermarkets, grocery shops don't seem to carry this. Even "The Store" has it.


Actually I made the DDL for this cake, a request from Lydia's nanny, so the balance, I made into ice cream.


Dulce De Leche Ice Cream, No Maker Recipe

140gm Dulce De Leche
3 egg yolks
200ml whipping cream
250ml fresh milk
1 empty vanilla pod (or use ¼ vanilla pod or 2 drops of vanilla extract)

1. Bring milk whipping cream and empty pod in a saucepan to a boil on medium heat. Let it sit for 5 minutes.
2. Meanwhile, beat egg yolks with sugar. Put in DDL and mix until well combined.
3. Fish out vanilla pods and pour ¼ of hot cream mixture into egg mixture. Whisk it immediately to prevent cooking. Pour in another ¼ and whisk. Lastly pour in the balance of cream mixture and whisk.
4. Sieve mixture back into saucepan. Cook on medium low heat until mixture thickens and coats the back of the spoon (I measured and it was 75C, definitely hot enough to kill salmonella). Do not bring it to a boil or else you’ll get gritty ice cream.
5. Pour everything into a bowl, let it cool down. Put in freezer.
6. When a ring of ice has formed, bring it out and whack it with your hand held mixer. Put it back into the freezer.
7. Repeat the whacking and freezing a few times until the ice cream is very thick and creamy,
8. Spoon ice cream into freezable containers (Tupperware freezermates) and freeze until hard.

The warm wind was blowing hard when I was taking pics on my window sill, and darn!!!
My ice cream started to melt in a blink of the eye.

I blinked too much that day anyway, cos the wind was blowing straight into my face while taking pics!!!

Sunday, August 1, 2010

Batik Cake or Hedgehog Slice


A cake requested by my mother in law. The only cake ever requested.

Each time she come back from US, she’ll talk about this marie biscuit cake, filled with some Milo fudgy sauce. I had no idea what it was, and I searched on the internet. Actually 2 years ago, I already found out that the cake was called Batik Cake, but I never made it. Until this time that she came back.

I finally made it. It's the one of the few stuff I made since she came back last Nov 2009, yeah it's more than half a year since I made this. As you can see those natural lighting photography was so bad, definately it was from ages ago

There are many versions on the internet, and I found that, some made it with eggs, some without. To me, with eggs should taste better. Some use cocoa, some don’t. Well, I can jack up the Milo and condensed milk content and do away with the cocoa powder, extra sugar and extra water. Well, I just don’t like to keep half opened up stuff as much as possible. So, to use up everything in one attempt has always been my preference.

And I also found out that it is called Hedgehog Slice in Australia. Maybe some Malaysians ciplak(pirated) it and gave it a local name, batik cake. You know la, please visit Petaling Street.

The condensed milk u see here, is Full Cream Condensed Milk, bought by Lydia’s nanny from Singapore.

You may substitute with the local sweetened creamer.

So, here are the ingredients
1 pack 250gm Marie biscuits (I got mini maries, u can use regular maries)
1 pack 200gm Milo , or u can use any malted chocolate drink like Ovaltine or Vico
1 can 397gm Sweetended Condensed Milk
4 large eggs
1 tsp vanilla
150gm butter, about 2/3 cup

What I did was,
1. Prepare one 7 inch square pan. Fully lined with non stick baking paper. Make sure the paper is much higher than the pan.
2. Lightly beat eggs. Put in Milo, and condensed milk and whisk until well combined.
3. Pour egg mixture into a non stick pot/pan , put in butter. On medium low heat, cook while stirring all the while until mixture starts to thickens. Reduce to low heat.
4. When the egg custard is cooked, it looks grainy and thick. Remove from heat.
5. Spread one layer of custard into the pan. Arrange marie biscuits onto custard.
6. Repeat step 5 until all biscuits or custard are used up. A thin layer of custard is enough for the interlayers.
7. When the layering is all done, fold in the high collars of the paper. Press down and compact the cake with ur hands.
8. Chill in fridge overnight before cutting.


Well, at first she said, it was it. But as she ate on..she said, not quite like it. The one she ate years ago was softer. The biscuits were softer, no biscuit feel at all, it's homogenous. Well, I've never eaten this before so I didn't not know how to gauge.

Hmmm... ok, next time I know what to do. I'll use evaporated milk instead so that there will be more liquid.


 Target has coupons for baking supplies.


Thursday, May 27, 2010

Fresh Mango Oatmeal


Never thought that I'd eat such healthy stuff right???

Actually I pretty much like oatmeal...... cooked my way.
When I was pretty much younger, in my early teens, I tried cooking according to the instructions on the packet, and I pretty much hated it. It was too too milky, so thick and yucky. The oatmeal was cloying and overloading for me.

But when I grew up later in my teens, my brother taught me to cook it in a much diluted method, then sweetened with condensed milk. Wow.. that was an eye opener. Truly different. It tasted much like wheat porridge, what we call in Cantonese as Mak Chuk, or in Malay Bubur Gandum/Terigu.

Then when I went into Teacher's Training in JB, I ate breakfast daily because break time was much later and I'll be so so hungry by then, so I made breakfast. It's almost oatmeal daily. Oh if you want to know whether I lose weight by eating oatmeal daily.. hahaha, no I didn't. And I will always try to put in fresh fruits to make it even nicer, strawberries, and bananas usually, because I could buy more and store. But I didn't use condensed milk anymore simply because condensed milk ain't the same stuff that it was when I was a kid, it became condensed filled milk or creamers and they tasted inferior. So I used fresh milk with a bit of sugar.

After the training ended, I was posted to rural oil palm estate where the nearest town was 68km away with nothing insight except oil palms all the way. So, keeping oatmeal in the pantry was a must. And whenever I get back to the estate from KL, I always pass by a large fruit stall. My friends and I always make a point to stop and buy fruits. I think I ate the most fruits during these 2 years I was working there. Mangoes were always the choice fruit to buy when it was in season. Simply because it could keep without referigeration and I definately prefer this than apples or oranges. It was during this time that eating oatmeal with mangoes started. My housemate who doesn't eat oatmeal, was converted after I made this for her. She totally changed her perspective about oatmeal and said it was so good, just like eating sweet soups.

So, here, maybe you'd like to try my way to convert your man or your child into eating oatmeal.
My 2 kids finished these 2 bowls.

1/2 cup quick cooking oats
2 cups water
1/2 cup fresh milk (if you are making this for your kid, you can use your child's milk formula, dissolved with some water)
1 Tbsp sugar
1/2 cup diced mangoes or more

Put water and oats into a saucepan. Bring to a boil. Lower heat to medium low, lid off and simmer for 5 minutes. Put in milk and sugar. Turn off heat and put into serving bowls. Top with diced mangoes.
Simply divine.

I used much lesser milk than traditional oatmeals and I find this just nice. Enough to make it creamy but not too much to make it cloying.

*Please note that the simmering time will affect the texture of the oatmeal. The longer you simmer it, the smoother it becomes and thicker it will be. And it thickens further when it cools down. So better gauge your consistency preference. The amount of liquids I use here is just right for me.

You may use strawberries, but it may be tart, so feel free to add in more sugar. Bananas are nice to go with this, and it is sweet and fragrant. Blueberries will be nice and slightly cooking it will bring out a nice colour from the skin.

To non oatmeal eaters, I dare you to try this.


Thursday, April 8, 2010

Making Dulce De Leche from Sweetened Condensed Milk


Pronounced, Dool-say De Leshay. It’s in Spanish and it means, milk caramel. You might have heard about it (U can't have missed it if u read my Dulce de Leche cake post) or you might have not. It’s not a common ingredient in the local baking scene.

So, how to make it? Few methods I’ve listed them here

Method (A)
Milk , sugar, baking soda and maybe some flavourings like vanilla or cinnamon.
1. Traditional simmering
http://www.uruguayuruguay.com/dulce-de-leche-recipes.htm
2. Slow Cooker
http://www.glutenfreeturtle.com/2008/01/09/slow-cooker-dulce-de-leche-cajeta-gluten-free/

Method (B)
Opened can of condensed milk:
1. Bake in oven: http://www.davidlebovitz.com/archives/2005/11/dulce_de_lechec.html
2. Microwaving : http://southamericanfood.about.com/b/2010/01/31/microwave-dulce-de-leche.htm
3. Double Boiler: http://southamericanfood.about.com/b/2009/01/16/easier-dulce-de-leche.htm

Method(C)
Unopened can of condensed milk.
-I don’t see how dangerous this as, as canning is also done with unopened jars/cans in heated in boiling water for an amount of time. Just don’t leave the pot dry and the heat on. Read: http://www.mykitchensnippets.com/2008/05/dulce-de-leceh-cheesecake.html
1. Simmering a can of sweetened condensed milk for 2-3 hours http://notwithoutsalt.com/2009/09/12/dulce-de-leche/
2. Pressure Cooker : cook a can of unopened sweetened condensed milk for 30-40 minutes, everywhere on the internet.
3. Simmering in slow cooker/crockpot: http://www.mangiodasola.com/2010/01/crockpot-dulce-de-leche.html

I tried out method (C)1. Simmering the can unopened.
I’m not sure if this will work with Malaysian “palm oil based” sweetened creamers.. I might experiment making this with full cream evaporated milk and sugar next time, cos I don’t get these real milk goo everytime from Singapore.

Updated 7/3/12: There is Sweetened Condensed FILLED milk (take not it's not full cream, and it's partially made with palm oil) on the supermarket shelves in Malaysia (after this post came out). Comes in 3 brands, Teapot, Marigold and F&N. Results are acceptable, I've made DDL using these few times before, not as fragrant, but texture is there. Better than nothing, right?

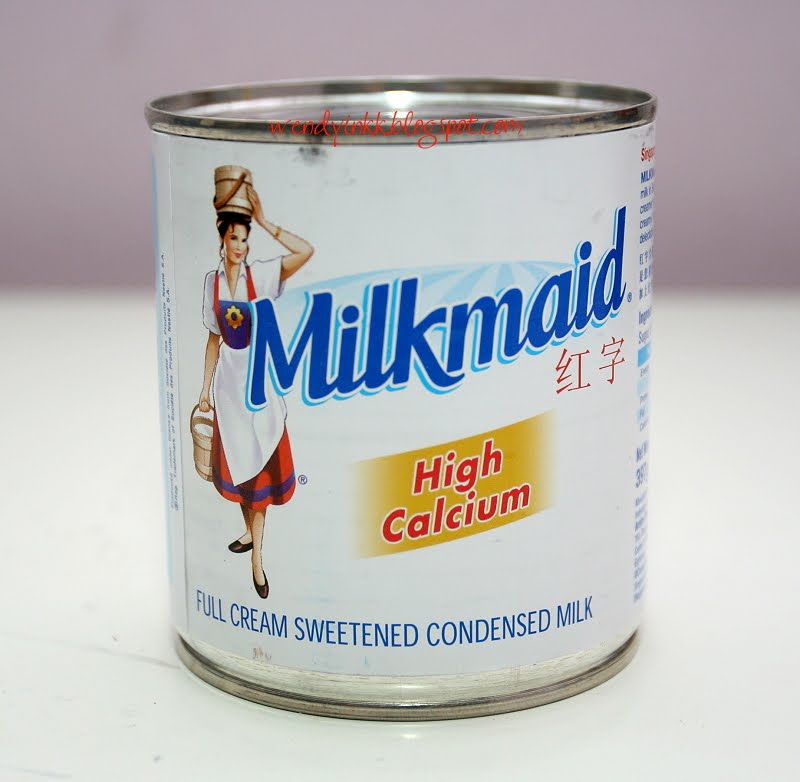
My dear Malaysian friends, you can't find "FULL CREAM SWEETENED CONDENSED MILK" on the shelves anymore. There is Milkmaid, yes, but it's Sweetened Creamer. Please scold the government for price controls which forced the manufacturers to sell us palm kernel oil creamers. Palm kernel oil is not the same as palm oil. Palm oil is the oil from the mesocarp(the outer flesh), whereas palm kernel oil is from the "nut", just like coconut oil. Oh ya, non dairy topping creams are made using palm kernel oil too. I saw that on the labels. So, I do try to use dairy or buttercream now, unless I can't avoid it but use non dairy topping cream.

Actually I prefer the non High Calcium version of this milk. Having more added calcium to it gives it a metallic taste, just like any other Hi-Calcium drinks, something that I will avoid if possible. But since this milk is a gift from Lydia's Nanny, I have no choice lor. After making it into DDL, the metallic taste is not obvious anymore.

I put it in a pot, on an overturned steaming rack. Brought it to a boil (lid on) and lowered it to a simmer. I had the water 1.5 inches above the can. I simmered the can for almost 4 hours, cos I forgot about it. I was doing my blog. I was supposed to do it for 3 hours only.
Don't worry, my the pot didn't lose much water and there was still 1 cm of water over the can. As long as the pot didn't dry up, you'll be alright.

I let the can of milk cool down in the pot until the water is warm. Then I fished it out and let the can COOL COMPLETELY before opening it. Do not attempt to open a hot or warm can!!!!


Tadaah!!! Pretty caramelly goo... Taste so good. You can use it to spread on your toast or make something with it, like what I did with my Dulce de Leche Cake. I'll do something else later, stay tuned.

I read from the internet that the best Dulce De Leche are made from Goat’s Milk and.. they’re from Argentina. If only someone would send me some… I won’t mind if it’s from somewhere else other than Argentina , as long as it’s dulce de leche. Canned ones like Nestle are gladly welcomed too 
I’ll send u something in return.

Thursday, March 11, 2010

Prune Layer Cake 2


Actually this was an order for Chinese New Year. This lady wanted a low cholesterol full egg yolk layered cake. Usually if I made this for personal consumption, I'll only do whole eggs, but since it's an order, ok, let's go for 30 egg yolks.

Recipe is similiar to the previous post, Haw flakes layer cake, but, I replaced the 10 whole eggs with 30 egg yolks.


450gm butter
140gm sugar
30 egg yolks from large eggs
510gm condensed milk
240gm cake flour
1 cannister Prunes, 340gm. Snip prunes into half. Press to flatten on a plate.

Method:
1. Preheat oven on grill setting. (My oven has either 230C or 250C setting, so I used 230C)
2. Use a 9x9 inch square pan. Line bottom of pan. Heat up pan for step 8 (I do this over the hot water I prepared for the water bath later).
3. Beat sugar and butter until light and fluffy.
4. Add in eggs, one by one. Beating well after each addition.
5. Mix in condensed milk
6. Sift flour and fold into batter.
7. Separate batter into 10 portions.
8. Spread a portion of batter evenly onto hot pan.
9. Tilt pan left and right to level batter. Grill for 7 minutes or until golden.
10. Remove from oven and press cake layer to remove excess air. Spread another portion of batter over the cooked layer, tilt pan to level batter and arrange flattened prunes onto batter. Grill for 7 minutes or until golden.
11. Alternate step 9 and 10 until batter is finished.

****
Pan needs to be heated up at step 2 for even distribution of batter. You can either heat up in the preheating oven or over a pot of hot water.

Switch off oven fan when u do this cake, if not, the bottom will burn at the end of the baking. If the fan cannot be turned off, like my oven, even on grill mode, bake this cake in a shallow water bath to prevent the base from over browning…my baking pan is 9X9 and my water bath pan is 10X10. Too big a water bath pan will leave u a very moist cake, and a longer browning time. But even if it gets too moist later, u can dry it up in the microwave on low for 10 minutes and then wrap it up again for even distribution of moisture from within.


What did I do with the leftover egg whites???? Few recipes coming up :)

Tuesday, March 9, 2010

Haw Flakes Layered Cake


Sarawak Style Layered Cakes... Long time never do this. I'm stingy to pay for the electricity the grilling uses.

I did this for Chinese New Year, I didn't bake any cookies. This is easier, at least I don't need to sit there doing nothing but shaping and filling cookies. For this I just put it in the oven, wait for the buzzer and do another layer. In between baking the layers, I can online, do this blog and fold my laundry, I have more liberty in short. More time for other things.

This time I used this type of Hawflakes, which I find to be not that good. The previous type that I used is the small pink packaging type. That one gives better flavour. To me this one in the picture is a bit too sweet and less tang.


I also changed the recipe this time. Did not use strawberry jam. Didn't use crushed Marie biscuits, but just cake flour.


The recipe this time is,

450gm butter
140gm sugar
10 large eggs
510gm condensed milk
240gm cake flour
few drops of red food colouring

Method:
1. Preheat oven on grill setting. (My oven has either 230C or 250C setting, so I used 230C)
2. Use a 9x9 inch square pan. Line bottom of pan. Warm up pan for step 8 (I do this over the hot water I prepared for the water bath later).
3. Beat sugar and butter until light and fluffy.
4. Add in eggs, one by one. Beating well after each addition.
5. Mix in condensed milk
6. Sift flour and fold into batter.
7. Divide batter into 2 parts. Colour one part with red food colouring, leave the other plain.
8. Spread a ladle of batter(red) evenly onto hot pan.
9. Tilt pan left and right to level batter. Grill for 7 minutes or until golden.
10. Remove from oven and press cake layer to remove excess air. Spread another ladle of batter (plain) over the cooked layer, tilt pan to level batter and arrange haw flakes onto batter. Grill for 7 minutes or until golden.
11. Alternate step 9 and 10 until batter is finished.

****
Pan needs to be warmed up at step 2 for even distribution of batter. You can either warm it up in the preheating oven or over a pot of hot water.

Switch off oven fan when u do this cake, if not, the bottom will burn at the end of the baking. If the fan cannot be turned off, like my oven, even on grill mode, bake this cake in a shallow water bath to prevent the base from over browning…my baking pan is 9X9 and my water bath pan is 10X10. Too big a water bath pan will leave u a very moist cake, and a longer browning time. But even if it gets too moist later, u can dry it up in the microwave on low for 10 minutes and then wrap it up again for even distribution of moisture from within.

Well, in order to make sure all layers are equal and that no either type of batter are in excess, I separate the batter into portions, kept in bowls. So that I will have equal layers, and no leftovers.

To serve,
Cut off dry ends, divide cake into 4 long pieces and slice each piece less than 1cm thick. This cake is not meant to be chomped on, but eaten slowly over tea. Taste better as it ages. I kept this at room temperature for over a week, and it still looks good. If kept in the fridge, it can keep for months.

Oh yes,
Nicole and Aunt Yee Wah, how was the pandan kaya layer cake??

Thursday, December 3, 2009

Coffee Cream Cheesecake


Another chilled cheesecake from Alex Goh


Sometimes some things are just made for each other, peanuts and coffee are a couple made in heaven.
We loved this cheesecake even before it hit our lips.. the smell of the coffee, with the peanuts and cheese......

I changed the topping of the original recipe from almond nibs to peanuts. And it was the perfect decision. I like all my coffee flavoured cakes to be paired with peanuts, just like pandan cakes must be paired with coconut :)

Here goes the recipe:

Sponge cake: any that u prefer, preferable size (Square: 9X9 X 1.5inch , round: 9X9 X 2inch). Cut into 2 layers or u can leave it as a single layer. I prefer double layer. If u want to use one layer, then use thinner sponges as preferred.

Filling:
250gm cream cheese, room temperature
200gm sweetenened condensed milk
150gm whipping cream, whipped
1 Tbsp instant coffee + 2 Tbsp hot water (I used Nescafe Gold, and it was so good, regular Nescafe was not as good)
1 3/4 Tbsp gelatin + 50ml water

Topping: 90gm toasted peanut nibs


1. Bloom gelatin in water for 2 minutes. Microwave on high for 30 secs or longer until gelatine dissolves. Leave to cool down.
2. Mix instant coffee with hot water. Stir to dissolve. leave aside to cool down.
3. Beat cream cheese and condensed milk until smooth and creamy.
4. Mix in coffee mixture, mix well.
5. Beat in gelatine mixture and mix well.
6. Fold in whipped cream.
7. Place 1 piece of sponge layer into cake ring/square case/spring form pan and pour half the filling onto it. Use a spatula to level filling.
8. Place the other piece of sponge and top with the balance of the filling. Level filling.
9. Immediately sprinkle toasted peanut nibs over cake and gently press.
10. Chill for 5 hours before serving.


There were 2 attempts here. The picture above was 2nd attempt and the one below was the first. Why are the colours of the fillings different? Well, I used different coffees. The first was Nescafe Gold, and the 2nd was Old Town White Coffee. Verdict: I love the version with Nescafe Gold.


Thursday, November 26, 2009

Oreo Condensed Milk Mini Cheesecake


The first 2 pics were first attempt. I broke up the oreos and stuffed them into the batter.
The one below with one whole Oreo is my 2nd attempt.


There's a cafe here in KK that makes yummy cheesecakes. I am thinking of recreating them.
Altho I know that they use whipping cream in their cheesecakes (a leak from a baking supplies shop), I am thinking of using condensed milk.

I saw a post on using condensed milk for cheesecake, and so, I adapted this recipe from there.

250gm cream cheese
150gm sweetened condensed milk
2 eggs, separated
1 small pinch of cream of tartar
1 Tbsp sugar
1 tube of Oreo (137gm)

*everything be at room temperature when u're ready to start.

1. Separate Oreos, leaving 12 pcs w/o cream intact and round. Put the rest of the biscuits together with the filling into a food processor and pulse til fine.
Remember to preheat ur oven (150C) and boil water after this.
2. Line big muffin tin (100ml capacity each) with 12 paper cups. Place 1 heaped teaspoon of oreo crumbs onto paper cups and smooth out with a teaspoon, lightly press the crumbs to flatten.
3. With a mixer, beat egg whites until frothy, add in cream of tartar continue to beat until soft peaks. Add in sugar and beat til stiff (as long as egg whites don't fall when overturned, it will be fine, no need to be pointy stiff). Set aside, and quickly do the next step.
4 Cream cream cheese on low speed until smooth (a minute or 2), put in condensed milk and egg yolks and continue to beat on low speed for another minute until well combined. Fold in egg whites.
5. Spoon (4) into prepared paper cups. Top with an oreo biscuit or u can break it up and put it where ever u like (middle, top)
6. Bake for 20 minutes in a waterbath.
7. Leave to cool in oven, door ajar. Cool completely before chilling.
8. Best chilled for 3 hours or more before serving.

*note: Malaysian Sweetened Condensed Creamer and Condensed Filled milk is generally sweeter than Condensed Full Cream Milk than can be purchased from out of the country. I made this recipe with Condensed Full Cream Milk, and so far those who ate what I made said it was just nice.

**Deflated egg whites will create a shorter and sweeter cake. Be careful when you fold in the egg whites. Don't deflate the batter.

I love this cheesecake. The beaten egg whites makes the cake soft and fluffy, unlike my marble cheesecake.

Really nice to eat, serious!!!


Monday, November 23, 2009

Avocado Chilled Cheesecake


Avocadoes... they can grow here. Only lately I knew that.
I used to think that they only grew in California... Muahahahaha!!!!

The avocadoes above were given to me by my children's nanny. They were grown in Sitiawan by her relative. I used them to make the tempting Avocado Cheesecake on the cover of Alex Goh's Fantastic Cheesecake cookbook. The recipe calls for yogurt in the cheese filling, of which I find the smell to be oh so unsuitable. I like the smell of milk with avocado in Vietnamese avocadoes milkshake, so next time, I'll omit the yogurt and sugar, and put in equal amounts of condensed milk.

The recipe in Alex's book:

Vanilla Sponge Cake (any variety, u can just use this recipe to make one)

Avocado Cheese Filling:
250gm cream cheese
60gm sugar
100gm avocado flesh (I used 200gm )
1 Tbsp lemon juice
1 Tbsp gelatin (I used 1 1/2 Tbsp)
50ml Water
100gm yogurt
200gm whipping cream

1. Place gelatin in a heatproof bowl and put in water. Leave for 2 minutes and microwave on high for 30 secs, or u can double boil it until the gelatin dissolves. Leave to cool to room temperature.
2. Cream cream cheese and sugar until smooth.
3. Combine lemon juice with avocado flesh and stir (or use a food processor) until smooth. Put this into (2)and mix until well combined.
4. Add (1) to (3) and stir until well combined. (I do all the mixing with a hand mixer). Add in yogurt.
5. Whip whipping cream until soft peaks and fold it into (4) until well combined.
6. Pour cheese filling onto sponge cake and level the surface. Referigerate for 4 hours or until set.


I like my chilled cheesecakes to be in 2 layers.... so it looks different than what is in the book.


I still have so many backposts................ Takes time to type them out... Those of u who've eaten this cake, u know how old this cake was :)
MIL's coming back from US next week, so it means, baking season is back...
More cheesecakes coming up soon......


Printfriendly

Related Posts Plugin for WordPress, Blogger...